
Showing posts with label Studio Tour. Show all posts
Showing posts with label Studio Tour. Show all posts
Sunday, February 28, 2016
Too Many Pillows?


Saturday, February 27, 2016
Lunch Table
 I wanted to add a little table for eating lunch or sitting with my laptop. The furniture is all scavenged from other places. Most of it stored in my husband's shop. I love the size and shape of this long narrow table. It is perfect here with this old captain's chair. The entryway on the far left of the picture is the passage into the wet studio / kitchen area (which is still a work in progress - trying to get organized in there and figure out how it needs to be set up).
Friday, February 26, 2016
Work Table Again


Wednesday, February 24, 2016
Cutting Table and Design Wall

Here is a view of the design wall and cutting table / work surface. I designed the work table base so that there would be sufficient leg room for people to be comfortable while sitting here on bar stools. I have one bar stool that I purchased to test my theory and I will eventually add more. The bar stools come from Target and I am hoping for either a sale or I will pick one up now and then to add to the space. At this point - I don't need more than the one for myself.
Eventually, I think I may be teaching in this space or facilitating the Artists Way group here. This work table was designed and built with multiple purposes in mind. I could even entertain in this studio! Come for coffee? I am very happy with the way the work table turned out. It measures 49 x 97" and is 36" high.
The design wall is 14 ft x 8 ft. I built a framework of 2 x 4s behind it and the Styrofoam insulation panels are covered in black flannel with Velcro strips on the back to hold them in place on the 2x4s. The wall here slants at a sharp angle behind the design wall and I built a shelf out of 2 x 4s for stability and storage. It is a large area and I could store a great amount of bulky stuff behind the design panels. I thought it would be easy to remove the panels to access things behind the design wall. However, I am not sure how well the velcro and panels are going to hold up to repeated removal and replacement. I will have to reinforce them if I am going to be accessing the storage behind frequently. At this point, I don't need the space, though - so there is nothing stored behind and the panels are going to stay put.
Black design wall? The one at my home studio is white. But I have it covered with a black sheet! I realized I like working and photographing with a black background, so that is what I installed here. I only hope the light doesn't cause it to fade too quickly. Time will tell!
Tuesday, February 23, 2016
Sewing Room New Studio


Eventually, the sewing machine will be dropped down into the table so it is a giant level sewing surface (49 x 97). I brought my old Janome 6500 in to see if I can be content with it. So far I have only been reminded of how much I dislike sewing on it. In my home studio, I primarily use a Juki 98Q. In fact, I have pretty much worn the Juki out and was already considering purchasing another one. They run about $700, so very affordable. I still contemplate a sit down quilter, as well, though.....so not yet sure what will become permanent in this sewing area. I don't want to cut into the work table until I am certain. Once the hole is cut - it is a long term commitment. 
I am thrilled with my giant ironing table that is built into this window nook. It measures 73 x 42" I covered plywood with aluminum foil, then a couple of layers of batting and finally wrapped on some upholstery twill that I've had for a decade or so. Staple gun was my tool of choice for this project. I will eventually build a giant shelf or two under the ironing table to store rolls of fabric and batting. I am not doing that until I decide exactly what supplies will be taking up residence in this space so I can customize the storage dimensions.
By the way - I did all this construction 100% by myself. Nobody else - except I did pay someone to carry the 49 x 79" sheets of melamine up two flights of stairs. So heavy and way too big and awkward.
Sunday, February 21, 2016
World Market Clearance Sofa


Saturday, February 20, 2016
Ottoman Made By Me


Friday, February 19, 2016
Slipper Chairs for New Studio

I was beginning to regret my wall color choices....."Wet Coral", "Yukon Gold", "Mermaid's Tail" and "Majestic Grape" - bright vivid colors that are not exactly popular decorating colors. As I searched for furnishings - I was discouraged by the prices as well as the limited color options. I shopped every furniture store in town as well as all the thrift stores. I thought I might have to resort to black, but I was resisting black for the furnishings since the design wall is black (pictures to come). I felt it would be too much black. So I kept looking - expanding my search to the Internet. I was delighted to discover these chairs at Target Online in Clearance. A bargain with free shipping - a bit of a gamble - since it is difficult to really read colors online, but I thought they would be close! I love these chairs and the colors are perfect for my wall colors! What a stroke of luck!
Thursday, February 18, 2016
Wet Studio / Kitchen

Wednesday, February 17, 2016
Sewing Room Set Up - The Beginning
 I decided this smaller office with good light will be the best location for my sewing machine and ironing table. Again, I looked for furniture for my sewing machine. There are lots of sewing machine cabinets on the market, but none of them really seemed right. I was especially dismayed by the price tag. So - I decided to build in my sewing machine table. Just a few screws into the stud wall (can be easily filled and painted over when I move out). I believe this will be a very stable and comfortable sewing surface.
Tuesday, February 16, 2016
New Studio Paint Progress
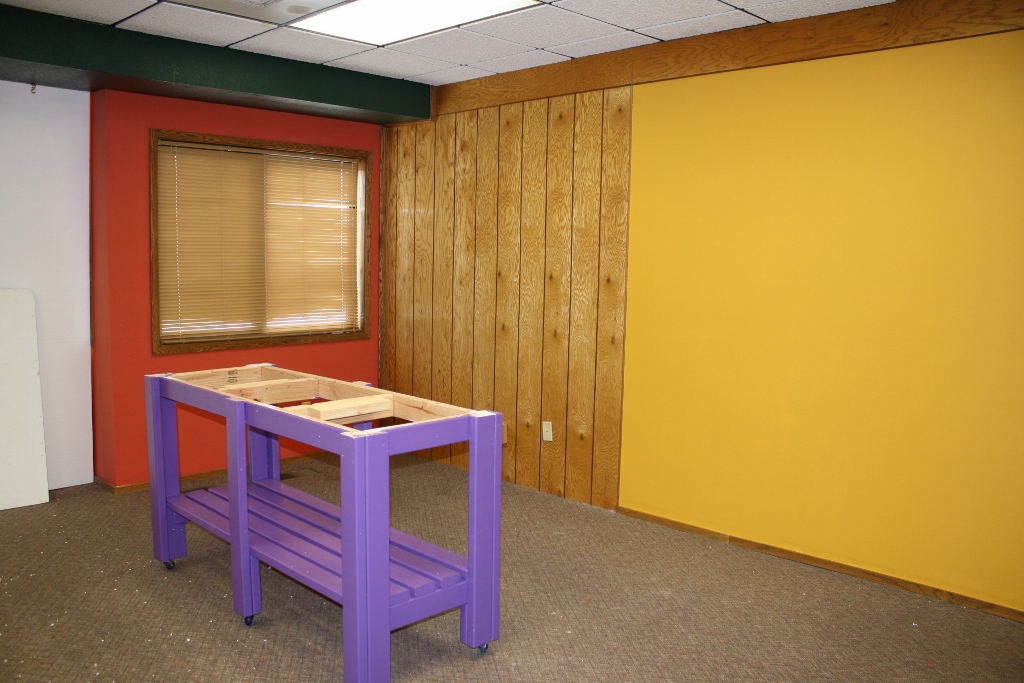
I've been working steadily at creating an inspiring work environment in a commercial office building (which I am co-managing with my daughter). This space was left trashed by the previous tenant and I spent a lot of time cleaning, repainting, etc. I chose bright cheerful colors for the walls. This seemed like a big leap of faith. I tried to just listen to my internal voice and ended up with some pretty random wall colors. These are not colors I have in my home or any other space......

Window treatments (above) are made from cheesecloth. I purchased a huge bolt of 60" wide cheesecloth years ago. I have not been using it in my work, so was glad to have it available for the window treatments. Who knew it could be so effective?
 After shopping around and not finding what I wanted as a work table, I decided to build one myself using 2x4 lumber. It turned out very sturdy. I put wheels on it and painted it purple. Stay tuned to see how it looks with the top added.


Friday, January 15, 2016
A Second Studio


Tuesday, April 22, 2014
My Print Table

Friday, November 29, 2013
Sorting in the Studio
Will I find a solution in my scrap drawer? Sometimes that is a good place to begin. So, I open it up and start sorting scraps out on the work table. Here are some of the piles.


Tuesday, November 19, 2013
Scorpion in my Studio

http://fieldguide.mt.gov/detail_ILARA64020.aspx
This is only the third time we have seen a scorpion since moving here in 2001. The others were much smaller (and were also found inside the house, by the way). I imagine it was seeking a spot to hibernate when it crawled in under the weatherstripping on the door. It looks like it has been stepped on.
Tuesday, December 13, 2011
Studio Interview with Quilting Arts Magazine

I was recently interviewed by Ellen Seeburger, Assistant Editor of Quilting Arts Magazine, and she has posted the interview on her blog. You can see the interview on Ellen's blog here.
Ellen asked me about my studio and my work.
Monday, September 22, 2008
Cynthia's Studio

Saturday, I opened my studio for tours as part of a fundraising drive for Big Sky Quilt Retreat. For this reason, I tidied up quite a bit, deep cleaned and hung some finished work on my design wall. I thought I would share some pictures of my workspace and tell you a bit about my arrangement.

My workspace is not a showplace. Although it is roomy, it has been outfitted with a mishmash of salvaged fixtures that have been cobbled together. While it is not very beautiful - it is extremely functional.
My worktables are Formica laminate - rescued from the dumpster behind TJ Maxx - which was remodeling. The drawers beneath the tables are old Hallmark drawers that Joe found on the curb in front of a store that went out of business. He constructed racks for my thread spools and bead strands out of dowels inset into drilled plywood. These are terrific and I have three large ones - all full, of course.

One 5' x 8' surface is set up to the correct height for me to work comfortably while standing. The other end is lower (just a little smaller), set up for my sewing machine with a big table for machine quilting.

I am currently in the process of switching from a desktop - to a laptop and I have a computer station at each end of the room.

My Janome 6500 has been recessed so that the bed of the machine is flush with the table top and this allows for smooth movement during quilting.
My design wall is large. I have one 8' square wall and another that is 4' square right next to it. This allows me to work on a number of different pieces at once. There is a track lighting system installed on the ceiling above the design wall and the bulbs are super bright - especially for photography. This is where I shoot most of my entry photos.

I picked up these two vintage silk dupioni upholstered chairs at an antique shop that was going out of business. This corner is set up for me to do my journaling, reading, and hand stitching. I love these chairs.

The window along the west wall allows a good view of the trees and sunsets. This sofa is a hide-a-bed, as cast off from another room and there was no place else for it to go. The lighting in the room consists of daylight fluorescent - three fixtures with four tubes in each. The room is very bright. I never have a problem seeing what I am doing.

My ironing surface is 3/4" particle board covered with foil, two layers of cotton batting, and covered with a cotton canvas grid. Joe attached it to the wall with hinges and the two front legs fold up, so if I ever wanted to - I could fold it flat against the wall. Instead, I have used the space beneath it as storage for my flat boxes of fabrics, etc.
I also have a mangle - awesome for ironing dyed fabrics, (not shown) which sits just to the right of my flat ironing table.
I keep a narrow 12' slat hanging above my ironing surface, and this is where I hang finished work - often while it is waiting to be sent off to a show.
In the picture above, at the far left is the doorway into my 9' x 11' wet studio. The picture below starts the tour of my wet studio.
I also have a mangle - awesome for ironing dyed fabrics, (not shown) which sits just to the right of my flat ironing table.
I keep a narrow 12' slat hanging above my ironing surface, and this is where I hang finished work - often while it is waiting to be sent off to a show.
In the picture above, at the far left is the doorway into my 9' x 11' wet studio. The picture below starts the tour of my wet studio.

The wet studio is also equipped with salvaged fixtures. Everything from the sink to the shelving to the pegboard on the wall came from somewhere else and was free. I am pleased to have a dedicated washing machine, sink, and microwave in this little workspace. Oh, and a thermofax machine, too! Yay!

I really like this little 4 x 2' folding table. I keep three sheets of 3/8" OSB (fiberboard) stashed behind it and pull them up when I need a portable work surface. The OSB is cut to 3 x 4' sizes and one has heavy plastic stretched over it - I use this when I want to paint fabric or paper. Another is covered with two layers of batting - and this one I use for stamping on fabric. With these multiple portable surfaces - I can easily switch from one task to another, setting one aside to dry while I work on the other one - a system I have used for about 8 years - very efficient.

I don't remember where Joe got these narrow shelves, but they appeared one day and he insisted I needed them. I reluctantly agreed and now I cannot imagine how I stored my dye before I had these!

My studio is also equipped with a woodburning stove and has a door leading directly outdoors. Unfortunately, it is the first door a person sees when approaching our house from the cul de sac so it is used much more often than I would like.
Subscribe to:
Posts (Atom)