Tomorrow, my piece will be available for bidding in the SAQA Fundraiser. It is an online auction. The price opens tomorrow at $750, then drops each day until the pieces are sold.
I've had my work sell on that first day - at $750. Shocking - I know, but it has happened a couple of times. I was slow getting my piece sent in this year, so I ended up on the very last page . . . . the very end of the auction. I do think placement has an impact, but we shall see!
All donated pieces are 12" square. This piece is a gelatin plate print done with beets from the Farmer's Market.
Here is a link to the page containing my piece in the SAQA Online Benefit Auction.
Adventures of a studio artist who works primarily with textile and mixed media art.
Showing posts with label Gelatin Plate Prints. Show all posts
Sunday, September 23, 2012
Sunday, January 22, 2012
Gelatin Plate Fern Print - 100 Foot Square
Here is the next piece in my 100 Foot Squares Series. This is a gelatin plate print I did quite a few years ago from a fern I harvested in my sister's Portland yard. Ferns this size don't grow here (at least not in my dry yard). I placed the fern fronds inside a ziplock bag for the 900 mile drive back to Billings, then I put them in the refrigerator upon arriving home, and they kept for about a week until I was able to get a gelatin plate ready for printing.
Here is a link to a post I did when I printed the fabric.
The butterfly is a Thermofax screen print adapted from a photo I took on a Beartooth Mountain hike. I print with black ink onto orange hand dyed fabric, then add the white dots later with a paintbrush.
Here is a link to a post I did when I printed the fabric.
The butterfly is a Thermofax screen print adapted from a photo I took on a Beartooth Mountain hike. I print with black ink onto orange hand dyed fabric, then add the white dots later with a paintbrush.
Saturday, October 29, 2011
On to the Next Beet Print Piece
Friday, October 28, 2011
Triple Beet Panels on Stretcher Bars
Yesterday, I showed how I glued my quilt to a prestretched canvas. Here is the result.
You can see how I finished the edge of the quilt with a specialty yarn (hand dyed by me) zig-zagged to the quilted edge. And also how I stitched over the pebbles with a variegated pearl cotton (in the very colors I used in the quilt)
And here is the piece in it's final form:
And a final detail.
I don't usually have difficulty coming up with a title for my work. It usually comes to me in the final stages. This time - it didn't happen for me. I would welcome suggestions. Thanks!
Thursday, October 27, 2011
Glueing a Quilt to Stretcher Bars! Yikes!
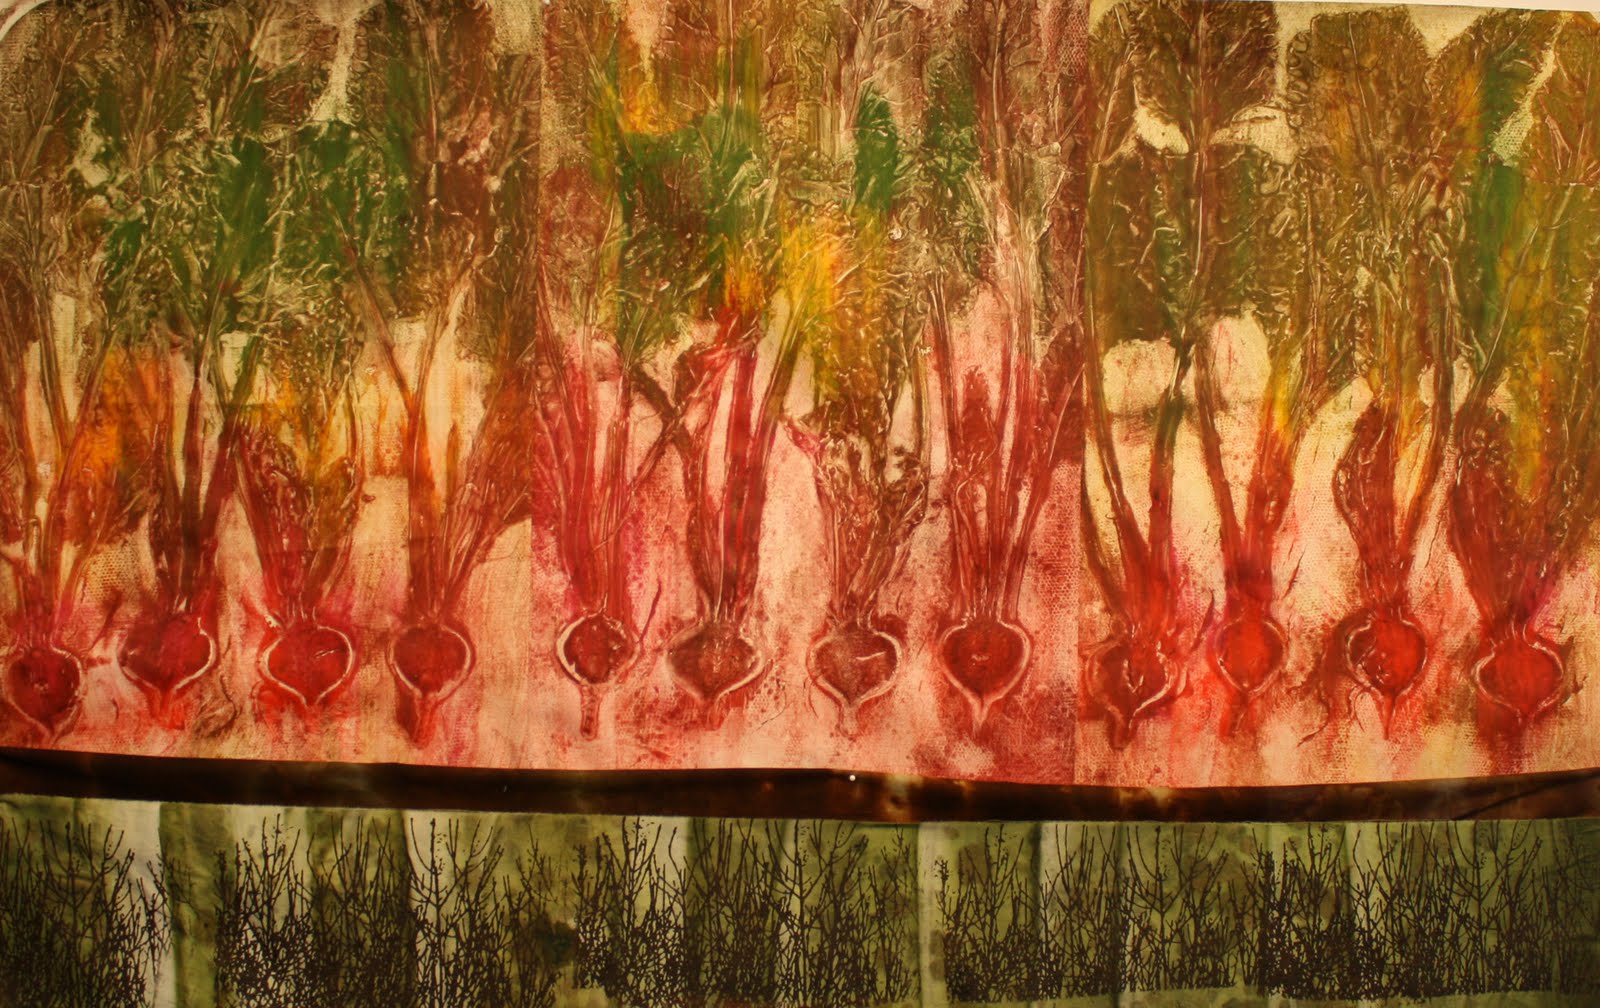
A while ago, I shared the final machine quilting for a Beet printed piece that is for a WAV group challenge. Part of the challenge is to create a piece that is mounted somehow to a 24 x 36" stretcher bar. For mine, I picked up a canvas at Michaels and painted the edges multiple times to get just the right shade of brown. Because my quilted piece comes almost (but not quite) to the edge, I decided I could not really stitch it it place (my preferred method because then it can be removed for a quilt show if need be).I have glued quilts to stretched canvases before, but never have I done one this large. Kind of tricky. I wanted to be sure I got the glue all the way to the edges, but not too far because the glue is kind of shiny, while the canvas is painted with a matte finish. Any glue that got beyond the quilt would show, even though it dries clear.
The glue I now use for everything is "The Ultimate". I find it holds virtually everything together and it is a polymer glue - so no toxic fumes. This is the same glue I used to attach the beach pebbles to the front of this piece.
For this particular application, I did dilute it very slightly with water because the glue is super thick. Then I applied it to both the back of the quilt and the canvas using a sponge brush. I started with the quilt resting in position on the canvas and folded it back to apply the glue to each half separately. I waited a few minutes until the glue was just barely starting to develop a clear skin on the edges.
Then, I carefully folded it back into place and pressed it carefully into position. It needs to dry at least 24 hours.
Saturday, October 15, 2011
Auditioning Pebbles for the Beet Prints
When I added the brown strip of hand dyed fabric beneath the group of three beet print panels, I conceived a plan to add some stone chips or pebbles along that line. I very often add tangible objects - metal, stones, etc. to my work. Looking through my stash of quilt sized rocks, I found only three types that I have sufficient quantity and are of the proper size.
Friday, October 14, 2011
3 Panel Beet Print Quilted
Well, I have finished with the quilting on this piece, which is composed of three panels of gelatin plate printed beets. The piece is entirely quilted with Aurofil Brown Cotton thread in size 28.
The edges of the brown fabric strip and the outside edges have been couched with a hand dyed specialty yarn.
I have some ideas for further embellishment. I will share those tomorrow.
Tuesday, October 11, 2011
Tuesday, October 4, 2011
Beet Trial

As I mentioned in a previous post, I am contemplating the quilting for two larger beet gelatin print pieces. I was considering doing the stitching with black thread, which would be a departure from the norm, for me. I often work out my questions for larger pieces by making a smaller one. In this case - I have added a border to a single gelatin print of beets.
I really like the delicate details brought out in a gelatin print - I mean, that's the point - right?So here goes:

I really like the way the black thread emphasizes the beets. I am less enthusiastic about the way the black thread looks on the leaves - as I feared - some of the delicate details are lost. At the same time, the leaf area looks less blurred and mushy. Hmmmmm.
Now thinking about the quilting for the border. It must not detract. All feedback welcome!
Sunday, October 2, 2011
Beets Again? Well . . .Yes
Saturday, October 1, 2011
Gelatin Prints - Beets in Red
I have been so pleased with the gelatin plate prints of beets done earlier in the summer, that I have run out of them! All used up, and I want to continue with the series, so I needed more prints. I also wanted the colors to be more red and less pink than the previous batch, so here is one group. I do plan to sew the panels together to make a larger piece, as shown above.
Here are two of the individual panels. I am happy with my results.
How can it be October already?
Friday, September 30, 2011
Gelatin Plate Prints - Sunflowers!
The sunflowers in my yard have been prolific and resilient against the drought and voracious grasshoppers! I decided to try to capture the last few rays of summer with another batch of gelatin plate prints.
The sunflowers were added after the leaves were dry. I need to decide soon if I want flowers printed on the other two leaf prints. Soon the frost will make the sunflowers disappear until next summer!
Tuesday, September 27, 2011
Extraordinary in the Ordinary Challenge
WAV Challenge
The local art group I participate in has a challenge - the title / theme is "Extraordinary in the Ordinary". The size - it must be mounted on a 2 x 3' stretched canvas. This is the piece (above) I plan to do for the challenge. My gelatin prints are each about 12 x 18", so I needed to add something to the bottom to meet the size requirement. Good thing - I think the strips on the bottom add a lot. I will begin quilting as soon as I finish another little home dec project I am working on.
Here is a detail of the screen printed bottom fabric strip. The background was painted with Setacolor Transparent Fabric Paints. The Thermofax screen is adapted from a photo I took of a hedge located in Harlotown, MT.
Sunday, September 25, 2011
Progress with Beet Prints
Several weeks ago, I did a series of gelatin plate prints using beet plants.
I really love the way they turned out and I am motivated to get them into some finished work.
I got the border attached to this group of four and am happy with it so far.
I really love the way they turned out and I am motivated to get them into some finished work.
I got the border attached to this group of four and am happy with it so far.
I wish the top right panel was not so light, but I think I can fix this with the quilting lines.I am mulling how I will quilt this piece - what color thread, etc. I usually use thread that blends, however, I am toying with using black to create an outline. This would be a distinct diversion from my usual.
It seems like a big risk for such a big piece. I might try my idea out first with a smaller piece - like this one (need to add a border first, I think).
Saturday, August 6, 2011
Beets on the Design Wall
Sunday, July 31, 2011
Saturday, July 30, 2011
Gelatin Prints of Onions
Subscribe to:
Comments (Atom)


